
We love design tricks that look complicated but are actually a piece of cake to create! Add emphasis and personality to your titles with our simple clipping mask tutorial that shows you how to create patterned type in just three easy steps. All you need is Adobe Illustrator and a patterned imaged or background.
Step 1: Start with text
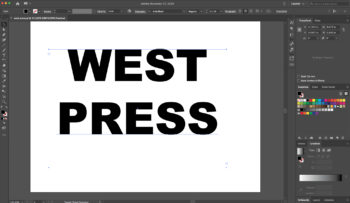
Keep clipping mask text to a few words. Multiple lines of text will be more difficult to read when a mask is applied. Thick weight fonts work best to show off the pattern.
If you’re stringing together vector font files into a phrase, group them together with a Compound Path by hitting Command+8 or by selecting Object > Compound Path > Make. This is a key element to successful clipping masks with multiple shapes. Without a compound path, the separate letterforms will not register the background.
Or you can use an existing font and with the Type Tool (T), type out the word or phrase. Don’t worry about making a compound path, as Illustrator registers the text as a grouped object.
Step 2: Find a pattern for your background
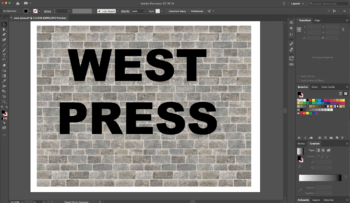
Seamless designs allow for infinite tiling without distinct borders or separations. Play with the size of the pattern for different effects but smaller patterns usually work best.
If needed, duplicate your image by clicking the image with the Selection Tool (V) and holding down the Option and Shift keys while click-dragging the image. Holding down the Shift key simplifies the tiling process by aligning the patterns perfectly for a smooth appearance. Select the images and group them together with Command G or Object > Group. Arrange the patterns behind the text by hitting Shift+Command+[ or with Object > Arrange > Send to Back.
Step 3: Make a clipping mask
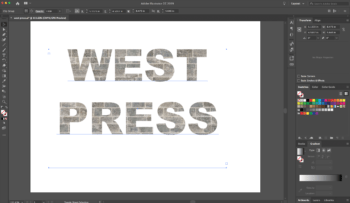
With the Selection Tool (V), click both the background and the text and hit Command+7 or navigate to Object > Clipping Mask > Make.
Edit the pattern or move the background around with Object > Clipping Mask > Edit Contents. To remove the clipping mask, simply hit Option+Command+7 and delete the background layer.
Ta-da! Your finished mask should look something like this.
West Press’ talented staff is here to help you each step of the way — from graphic design to printing to mailing services to large format. Contact West Press or your Account Executive at 520-624-4939 today.